
ix”>
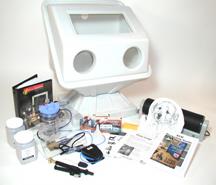 We choose the SCM Jetstream One sandblasting system for its compact size, versatility, and SCM’s support. We toyed with the idea of buying the basic components from Harbor Freight; however, once we priced out the equivalent items plus sources for spare parts we found that it would have cost more to source everything separately. Additionally, with the Jetstream One system, we are able to easily break it down into a box to transport it to shows and field events. Additionally, the package included the photo masking system that we use for much of our stock carving.
Unpacking Our New Jetstream One
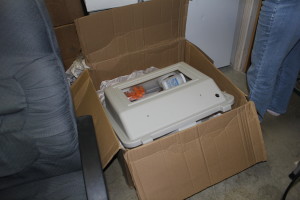 As soon as the shipment arrived, everyone stopped work and crowded around the loading dock. To our amazement, everything arrived in two boxes. The air compressor had arrived a few days earlier in a separate shipment. We knew the system was much more compact than other systems we reviewed; however, we were amazed at how easy it was broken down into its basic components. This immediately started everyone talking about how we could take it to shows and field events without taking up much room in the RV. Before unpacking everything we took the whole shipment outback to the RV and found that it fit nicely into the lower rear storage compartment with the air compressor included. We immediately knew that we had made the right decision to purchase this system as it fit into our plans perfectly. Space in our shop is very limited so anything new has to be able to slide in without disrupting our current equipment. Eventually we will be forced into moving to a bigger shop, but for now this is what we have. The Jetstream One system will also fit into our show booth without having to do too much re-arranging.
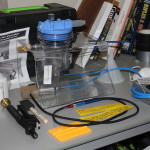 As we unpacked and inventoried each item we became more anxious to try it out. The setup instructions are fairly intuitive; however, you do have to do a little head scratching and figuring things out occasionally. The one thing you have to remember is that some items shipped with the system have been improved, but the instruction sheets have not been fully updated. Just take your time while putting everything together and enjoy the anticipation of your new system.
Connecting The Air Lines
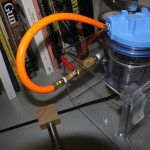 When connecting the air-line from the compressor to the pressure pot we opted to add a 1/4″ NPT M-F ball valve to cut-off the air from the compressor when we’re not sandblasting. We found this valve at Harbor Freight. It can also be found at most hardware stores such as ACE hardware also. Make sure you use Teflon tape on all of the screw-on fittings in your airline. The tape will ensure a tight and no-leak connection.
 Connecting the blue airline from the regulator to the pressure port was quite easy. Just slide the line into the fitting until you feel a small snap. Tug on it slightly to ensure that it is fitting snugly. If you need to remove the airline just press inward on the black ring with one hand while gently pulling the airline out with the other hand.
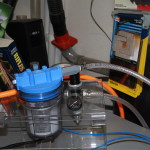 Since space is quite limited we needed a longer air line from the regulator to the pressure pot in order to mount the assembly on the wall instead of using the table stand that is provided. We removed the air line connectors provided with the system and substituted 1/4″ NTP air line connectors and added a longer 1/4″ I.D. pressure rated hose. This change only took 5 minutes to complete and gave us greater flexibility in placing the equipment in its permanent location.
 Setting up the sandblasting cabinet was quite easy. There are only 3 major pieces tot he cabinet: base, main shell, and lid (top). When connecting the main shell to the base we found the screw holes didn’t line up accurately. However, since the screws are self tapping screwing them down into the base was easily accomplished with a screwdriver.
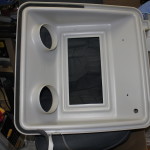 Adding the weather stripping seal into the top of the cabinet is easy; however, there is a little trick that will make it easier to keep in straight and allow you to position it in the bottom of the trough. Use your thumb and forefinger to pinch the sides of the weather stripping tape together with the sticky side down. Then, use your forefinger of the other hand to press the tape down into the bottom of the trough. Make sure that the tape is evenly distributed around the cabinet top so that it will form a tight seal while you are using the sandblaster. This is also a good time to attach the protective gloves to the lid using the large hose clamps provided in the kit.
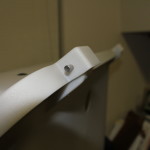 Place the lid on the main shell and insert the hinge bolts. Pressing the hinge bolts into the holes while lining up the holes of the shell and lid may require a few extra hands. We used a small wood clamp to hold the pieces together while pressing the bolts into place. We eventually change the slip bolts for carriage bolts to make it easier to disassemble the cabinet when we go to shows and field events.
 Push the sandblasting hose through the back of the cabinet and place the sealing grommet in place.
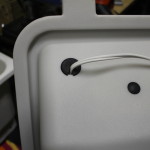 Push the light cord through the back of the cabinet and place the sealing grommet in place.
 We connected our shop-vac to the 2-1/2″ port provided on the back of the cabinet to draw off the extra dust created during sandblasting. We initially tried sandblasting without the vacuum, but after a few minutes, the visibility within the cabinet was reduced greatly. Also, when the cabinet was opened after sandblasting a lot of sand dust escaped the cabinet. For the typical use of the cabinet, a basic shop-vac from your local hardware store is more than adequate for the task. Just remember to clean the shop-vac regularly.
 All that is left to do is to remove the protective sheet on the window. The total setup time took less than an hour including the various additions that we added to the airlines.
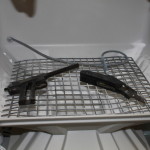 The cabinet is just right for sandblasting parts. Sandblasting long barrels requires being a bit creative by removing the grid and placing the barrel into the media well.