
My heart ached as I stared at the little single-shot rifle sitting in a rack in the back of our local hardware store. Only a day before Christmas, and “my” rifle was still on the shelf. I wanted that rifle so badly, but I didn’t have any money to buy it. My only hope was my folks might purchase it as a Christmas present, but sadly, the chances didn’t look good.
 I was 12 years old and had grown through a succession of Daisy air rifles—wear them out is more correct. I remember the day I saw the beautiful little Anschutz single-shot .22; I went to the back of the store almost every day and ogled it. The gun stood out from all the other single-shots because the stock was figured walnut and the bluing was deep and shiny. The rifle was also several dollars more than any other single-shot in that store.
My brother and I rushed to the tree bright and early Christmas morning. There were lots of wrapped packages, but nothing long and rifle-like. After opening a gift or two, we had breakfast before returning to the Christmas tree. To my amazement, a long package had found its way under the tree—and I wasn’t disappointed. I still have that little rifle; it’s sitting in the back of a big gun safe. The .22’s extractor is worn and not completely reliable, but I don’t care. It’s a special rifle and always will be. Every so often I take it out, crank open the bolt, look through the open sights and memories flood my mind—this little rifle was my best buddy for a long time. It still is.
Those were simple days: Kids could walk through town with an air rifle or .22 rimfire and not incur the wrath of a SWAT team. Farmers appreciated the elimination of gophers and crows, and guns were not bad, nor were they indicators of evil intents or actions.
Firearms are still wonderful Christmas gifts. To make the right choice for a son or daughter, parents should consider the age and maturity of the child, type of firearm, weight, barrel length, length-of-pull and, of course, recoil. I would also include the necessity of high-quality sighting equipment. Very simply, anyone learning to shoot a rifle is more accurate with a scope.
Making A List, Checking It Twice
I think the ultimate first gun for a responsible youngster is a BB gun or air rifle. Thanks to the excellent BB/pellet traps and target designs available today, safe firearm handling and marksmanship basics can even be taught in the comfort of a good-sized room in your home with these air guns.
When most hunters think of BB guns they think Daisy, and rightly so. Introduced in 1939, the Daisy Red Ryder has sold more than 9 million units, easily making it the most famous BB gun ever built. Daisy Outdoor Products still makes the Red Ryder, as well as many other excellent air guns. In addition to Daisy BB guns, parents can also check out the air guns and accessories from companies such as Gamo USA, Beeman and Crossman.
After spending a year or two with an air gun, your child will be ready to step up to a rimfire rifle. In no particular order, here are some models that have recently caught my eye:
• HENRY MINI BOLT YOUTH: Not long ago I added a Henry .22 rifle to my gun safe. This tiny bolt-action gun is perfect for introducing my grandkids to the sport I love so much. Our 41⁄2-year-old proved deadly on large red balloons at eight paces during her first shooting experience! Henry builds a wonderful group of bolt-action and lever-action rimfire rifles.
• CHIPMUNK RIFLE: Like the Henry Mini Bolt Youth, the single-shot Chipmunk is another good-quality bolt-action rimfire designed for young shooters. Available in several stock materials and colors, these eye-catching little rifles would make any child’s Christmas special.
• REMINGTON MODEL FIVE: Remington makes several outstanding youth-scaled firearms, but the Model Five is my favorite. This bolt-action, clip-fed repeater is a fine first rifle.
• MARLIN 915Y: This single-shot is available in either wood or composite, blued or stainless for small-sized shooters. The Marlin 915Y is a simple, safe and accurate shooter.
• RUGER 10/22: As one of the best-selling .22s of all time, the standard-sized 10/22 semiauto is already a small enough gun for many young shooters. However, if you need an even smaller version, check out the 10/22 Compact Rifle. It features a short, 123⁄4-inch length-of-pull and 161⁄8-inch barrel.
• SAVAGE CUB MINI YOUTH: In addition to this single-shot bolt-action .22, Savage also offers youth-model centerfires.
• BROWNING MICRO HUNTER: Available in smaller calibers, this would be a dream rifle for many young hunters. In fact, this is by far the sweetest little centerfire I’ve ever handled. Browning’s lever-action BL-22 and wonderful semiauto rimfires are also fine guns.
• MOSSBERG HALF-PINT PLINKSTER AND PLINKSTER: The Half-Pint Plinkster is a neat little bolt-action single-shot; the standard Plinkster is a semiauto. As a youngster becomes more experienced with the Half-Pint, the removable magazine plug can be replaced with an optional 10-round magazine, easily converting the Half-Pint into a repeater. For upland birds or waterfowl, Mossberg’s youth shotgun is called the 500 Bantam and is available in a couple different designs.
• ROSSI TRIFECTA: One of the most practical and compact gun packages is the Rossi Trifecta. This youth-stocked rifle comes with three barrels—20 gauge shotgun, .243 Win. centerfire and .22 rimfire —which makes it a do-anything rig. With a simple break-open design and a button safety, this is a handy starter package.
In addition to guns as Christmas gifts, parents can also consider youth-sized camouflage clothing, binoculars, decoys, game calls, safety harnesses, bow-and-arrow packages and even memberships in the local fish and game associations. A post-Christmas hunting trip in one of the states with later seasons would be welcomed as well.
From past experience, both during my youth and during my adult life, I do know that putting a hunting-related gift under the Christmas tree provides the opportunity for you to spend special time with your family outdoors. And my motto has always been, “The family that hunts together, stays together.”
 We choose the
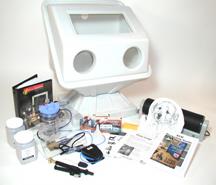
  As soon as the shipment arrived, everyone stopped work and crowded around the loading dock. To our amazement, everything arrived in two boxes. The air compressor had arrived a few days earlier in a separate shipment. We knew the system was much more compact than other systems we reviewed; however, we were amazed at how easy it was broken down into its basic components. This immediately started everyone talking about how we could take it to shows and field events without taking up much room in the RV. Before unpacking everything we took the whole shipment outback to the RV and found that it fit nicely into the lower rear storage compartment with the air compressor included. We immediately knew that we had made the right decision to purchase this system as it fit into our plans perfectly. Space in our shop is very limited so anything new has to be able to slide in without disrupting our current equipment. Eventually we will be forced into moving to a bigger shop, but for now this is what we have. The Jetstream One system will also fit into our show booth without having to do too much re-arranging.
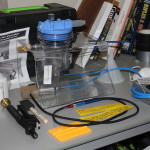 As we unpacked and inventoried each item we became more anxious to try it out. The setup instructions are fairly intuitive; however, you do have to do a little head scratching and figuring things out occasionally. The one thing you have to remember is that some items shipped with the system have been improved, but the instruction sheets have not been fully updated. Just take your time while putting everything together and enjoy the anticipation of your new system.
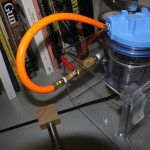 When connecting the air-line from the compressor to the pressure pot we opted to add a 1/4″ NPT M-F ball valve to cut-off the air from the compressor when we’re not sandblasting. We found this valve at Harbor Freight. It can also be found at most hardware stores such as ACE hardware also. Make sure you use Teflon tape on all of the screw-on fittings in your airline. The tape will ensure a tight and no-leak connection.
 Connecting the blue airline from the regulator to the pressure port was quite easy. Just slide the line into the fitting until you feel a small snap. Tug on it slightly to ensure that it is fitting snugly. If you need to remove the airline just press inward on the black ring with one hand while gently pulling the airline out with the other hand.
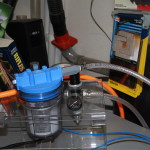 Since space is quite limited we needed a longer air line from the regulator to the pressure pot in order to mount the assembly on the wall instead of using the table stand that is provided. We removed the air line connectors provided with the system and substituted 1/4″ NTP air line connectors and added a longer 1/4″ I.D. pressure rated hose. This change only took 5 minutes to complete and gave us greater flexibility in placing the equipment in its permanent location.
 Setting up the sandblasting cabinet was quite easy. There are only 3 major pieces tot he cabinet: base, main shell, and lid (top). When connecting the main shell to the base we found the screw holes didn’t line up accurately. However, since the screws are self tapping screwing them down into the base was easily accomplished with a screwdriver.
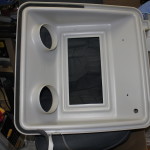 Adding the weather stripping seal into the top of the cabinet is easy; however, there is a little trick that will make it easier to keep in straight and allow you to position it in the bottom of the trough. Use your thumb and forefinger to pinch the sides of the weather stripping tape together with the sticky side down. Then, use your forefinger of the other hand to press the tape down into the bottom of the trough. Make sure that the tape is evenly distributed around the cabinet top so that it will form a tight seal while you are using the sandblaster. This is also a good time to attach the protective gloves to the lid using the large hose clamps provided in the kit.
 Place the lid on the main shell and insert the hinge bolts. Pressing the hinge bolts into the holes while lining up the holes of the shell and lid may require a few extra hands. We used a small wood clamp to hold the pieces together while pressing the bolts into place. We eventually change the slip bolts for carriage bolts to make it easier to disassemble the cabinet when we go to shows and field events.
 Push the sandblasting hose through the back of the cabinet and place the sealing grommet in place.
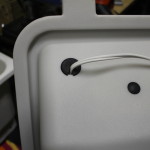 Push the light cord through the back of the cabinet and place the sealing grommet in place.
 We connected our shop-vac to the 2-1/2″ port provided on the back of the cabinet to draw off the extra dust created during sandblasting. We initially tried sandblasting without the vacuum, but after a few minutes, the visibility within the cabinet was reduced greatly. Also, when the cabinet was opened after sandblasting a lot of sand dust escaped the cabinet. For the typical use of the cabinet, a basic shop-vac from your local hardware store is more than adequate for the task. Just remember to clean the shop-vac regularly.
 All that is left to do is to remove the protective sheet on the window. The total setup time took less than an hour including the various additions that we added to the airlines.
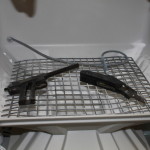 The cabinet is just right for sandblasting parts. Sandblasting long barrels requires being a bit creative by removing the grid and placing the barrel into the media well.
 At that point, I decided to start on a new campaign of cleaning and restoring them in what little spare time I have.
 Once all of the parts were disassembled they were first washed in a degreaser then flushed with warm water and dried thoroughly.
 Before I go into the details of this restoration we should take a look at the workshop so that you’ll see that it takes a good work area and good tools to work on firearms properly.