
During a visit to a local gun shop, I overheard a fellow ask about the availability of a light-kicking rifle such as a .243 Win. or .257 Roberts. “My daughter’s only 12 years old,” he said, “but she really enjoys deer hunting and shooting.” The girl was standing beside her dad, and I could see she was disappointed when the clerk said he didn’t have any small-caliber deer rifles, either new or used.
Since I happened to know the father, I suggested a couple of other gun shops that carry such rifles. I also told him to check out Federal and Remington’s new reduced-recoil hunting ammo. Available in several popular cartridges, this ammo is intended for recoil-sensitive shooters of all ages and sizes, as well as anyone of slighter stature, such as young hunters and women.
I had the opportunity to shoot Remington’s reduced-recoil ammo at the last SHOT Show in Las Vegas. I was particularly impressed with the company’s Managed Recoil shotgun slug and buckshot loads. The Remington representative loaded a short-barreled Model 870 pump with alternating Managed Recoil and standard loads.
We shot offhand at 30-yard targets and the recoil reduction was significant-I knew immediately that this stuff really works! And as a bonus, I shot more accurately when I wasn’t getting punched on the shoulder by the lightweight shotgun.
WHEN LESS IS MORE
I recently obtained a supply of Federal Low Recoil and Remington Managed Recoil ammo so I could learn more about its performance. Essentially, the two companies have reduced recoil in two different ways. Federal, which offers its Low Recoil ammo in .308 Win. or .30-06, has maintained bullet weight and reduced the powder charge.
The 170-grain .30 caliber soft-point bullet in these offerings is also used in its standard .30-30 Win. load, and the resulting velocities in the Low Recoil ammo are very similar to those of the .30-30 Win.
Remington, on the other hand, chose to keep velocities higher in its Managed Recoil ammo so it reduced the weight of the bullet. This makes for less recoil while still keeping flat trajectories and excellent terminal ballistics. Remington offers three calibers in its Managed Recoil line: The .270 Win. uses a 115-grain Core-Lokt Pointed Soft Point, the 7mm Rem. Mag. uses similar 140-grain bullets and the .30-06 load has 125-grain bullets. All this ammo is designed for deer-killing performance, and I’m very impressed with the accuracy I obtained in a variety of rifles.
Besides accuracy and velocity, I was intrigued with the challenge of determining just how much recoil reduction actually occurred. I happen to have some buddies who enjoy my various shooting “projects,” so we sat down and bounced ideas around as to how to compare recoil in a shooting experiment. I wanted to determine three things: accuracy, velocity and recoil reduction.
The first two are easy-shoot through an Oehler chronograph and get a printout of velocities and also measure group size on the target. Recoil reduction, however, was another challenge. We considered rigging a recoil scale or measuring the depth of gun stock impact into a block of clay, but decided we needed something simpler. Finally we came up with the idea of dragging a constant weight attached to a gun during each shot, then measuring how far the weight moved after firing various types of ammo. It sounded good, so we headed to the range.
Our technique evolved into a very effective test after a few practice shots. We tethered a 5-pound lead weight to a gun’s trigger guard, then dragged the rifle with the attached weight several inches along the bench top to put a constant “load” on the nylon cord that attached the weight to the rifle. The rifle was supported upright by a Harris bipod and the bottom tip of the recoil pad. The toe of the butt was placed on a line drawn on the tabletop, and we fired the rifle with a gentle pull of a string.
At each shot, the rifle moved straight back in a remarkably smooth movement. We fired five shots in a test string, measuring and recording the gun movement distances. We shot three different types of ammo in our .308 Win. and .30-06 rifles. Then we set up the Oehler 35P chronograph and shot several groups to record velocity and accuracy data.
Let me emphasize that these are not laboratory findings. I simply wanted to show a difference in how a rifle shot using reduced-recoil ammo vs. standard ammo. As the test results show, each rifle moved significantly less when shot with the reduced-recoil ammo.
This test had a special significance for Wayne, one of my hunting partners, because several weeks prior he’d had eye surgery. He’d been under strict orders not to fire a rifle for fear of damaging the results of the delicate surgery, but his doctor had just given him clearance to shoot again. Wayne decided to take it easy by shooting the reduced-recoil ammo initially. He proved he hadn’t lost his touch by firing five Federal Low Recoil 170-grain .308 Win. rounds into a 0.482-inch group at 100 yards! We also shot this ammo in two Remington M-700 rifles with consistent sub-minute results.
The .30-06 Federal Low Recoil ammo also shot very well, with groups averaging 1-1 1/4 inches. We all agreed that with this ammo, the Remington M-700 was the most pleasant shooting .30-06 we’d ever fired.
Bullet drop at 200 yards was only 3 inches, and we kept all our bullets in a 4-inch-diameter circle. This compares to almost 6 inches of drop at 200 yards with the Federal 170-grain reduced-recoil ammo in the .308 Win..
THE BOTTOM LINE
Unfortunately, I haven’t had the opportunity to hunt with this new ammo, but I’m confident both brands will kill deer cleanly out to 200 yards. The manufacturers say recoil reduction is 35-50 percent (depending on what ammo you normally shoot), and I have no reason to doubt those claims after my test. The reduction is significant, period. Shotgun shooters will particularly appreciate the recoil reduction as you can actually see the difference in recoil movement (barrel jump) between reduced-recoil and standard shotshells.
Low Recoil, Managed Recoil or reduced recoil-whatever words you use-I believe this ammo is a great idea. Recoil-sensitive shooters can shoot standard-weight hunting rifles more comfortably, and with the recent focus on super-lightweight rifles, this ammo won’t punish the shooter. And the biggest benefit is more new shooters will enjoy our sport and hopefully become successful hunters.
REDUCED-RECOIL AMMO TEST
Test #1: .308 Win., custom Remington M-700 rifle Standard ammo: Remington Express Core-Lokt 150-grain Soft Point Average velocity: 2,881 fps Average five-shot group at 100 yards: 1.22 inches Rifle recoil distance: 3.5 inches
Standard ammo: Winchester Supreme 168-grain Ballistic Silvertip Average velocity: 2,667 fps Average five-shot group at 100 yards: .89 inches Rifle recoil distance: 3.12 inches
Reduced-recoil ammo: Federal Low Recoil 170-grain Soft Point Average velocity: 1,997 fps Average five-shot group at 100 yards: .77 inches Rifle recoil distance: 2.25 inches
Test #2: .30-06 Remington M-700 BDL factory rifle
Standard ammo: Black Hills Gold 150-grain Ballistic Tip Average velocity: 2,850 fps Average five-shot group at 100 yards: .88 inches Rifle recoil distance: 2.66 inches
Standard ammo: Black Hills Gold 165-grain Ballistic Tip Average velocity: 2,627 fps Average five-shot group at 100 yards: 1.10 inches Rifle recoil distance: 2.85 inches
Reduced-recoil ammo: Remington Managed Recoil 125-grain Soft Point Average Velocity: 1,526 fps Average five-shot group at 100 yards: 1.57 inches Rifle recoil distance: 1.10 inches
 I was 12 years old and had grown through a succession of Daisy air rifles—wear them out is more correct. I remember the day I saw the beautiful little Anschutz single-shot .22; I went to the back of the store almost every day and ogled it. The gun stood out from all the other single-shots because the stock was figured walnut and the bluing was deep and shiny. The rifle was also several dollars more than any other single-shot in that store.
 We choose the
 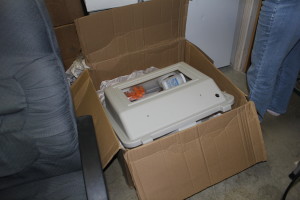 As soon as the shipment arrived, everyone stopped work and crowded around the loading dock. To our amazement, everything arrived in two boxes. The air compressor had arrived a few days earlier in a separate shipment. We knew the system was much more compact than other systems we reviewed; however, we were amazed at how easy it was broken down into its basic components. This immediately started everyone talking about how we could take it to shows and field events without taking up much room in the RV. Before unpacking everything we took the whole shipment outback to the RV and found that it fit nicely into the lower rear storage compartment with the air compressor included. We immediately knew that we had made the right decision to purchase this system as it fit into our plans perfectly. Space in our shop is very limited so anything new has to be able to slide in without disrupting our current equipment. Eventually we will be forced into moving to a bigger shop, but for now this is what we have. The Jetstream One system will also fit into our show booth without having to do too much re-arranging.
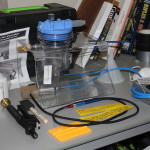 As we unpacked and inventoried each item we became more anxious to try it out. The setup instructions are fairly intuitive; however, you do have to do a little head scratching and figuring things out occasionally. The one thing you have to remember is that some items shipped with the system have been improved, but the instruction sheets have not been fully updated. Just take your time while putting everything together and enjoy the anticipation of your new system.
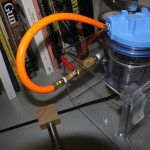 When connecting the air-line from the compressor to the pressure pot we opted to add a 1/4″ NPT M-F ball valve to cut-off the air from the compressor when we’re not sandblasting. We found this valve at Harbor Freight. It can also be found at most hardware stores such as ACE hardware also. Make sure you use Teflon tape on all of the screw-on fittings in your airline. The tape will ensure a tight and no-leak connection.
 Connecting the blue airline from the regulator to the pressure port was quite easy. Just slide the line into the fitting until you feel a small snap. Tug on it slightly to ensure that it is fitting snugly. If you need to remove the airline just press inward on the black ring with one hand while gently pulling the airline out with the other hand.
 Since space is quite limited we needed a longer air line from the regulator to the pressure pot in order to mount the assembly on the wall instead of using the table stand that is provided. We removed the air line connectors provided with the system and substituted 1/4″ NTP air line connectors and added a longer 1/4″ I.D. pressure rated hose. This change only took 5 minutes to complete and gave us greater flexibility in placing the equipment in its permanent location.
 Setting up the sandblasting cabinet was quite easy. There are only 3 major pieces tot he cabinet: base, main shell, and lid (top). When connecting the main shell to the base we found the screw holes didn’t line up accurately. However, since the screws are self tapping screwing them down into the base was easily accomplished with a screwdriver.
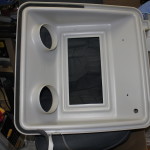 Adding the weather stripping seal into the top of the cabinet is easy; however, there is a little trick that will make it easier to keep in straight and allow you to position it in the bottom of the trough. Use your thumb and forefinger to pinch the sides of the weather stripping tape together with the sticky side down. Then, use your forefinger of the other hand to press the tape down into the bottom of the trough. Make sure that the tape is evenly distributed around the cabinet top so that it will form a tight seal while you are using the sandblaster. This is also a good time to attach the protective gloves to the lid using the large hose clamps provided in the kit.
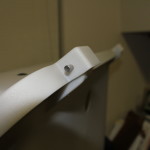 Place the lid on the main shell and insert the hinge bolts. Pressing the hinge bolts into the holes while lining up the holes of the shell and lid may require a few extra hands. We used a small wood clamp to hold the pieces together while pressing the bolts into place. We eventually change the slip bolts for carriage bolts to make it easier to disassemble the cabinet when we go to shows and field events.
 Push the sandblasting hose through the back of the cabinet and place the sealing grommet in place.
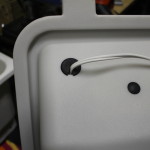 Push the light cord through the back of the cabinet and place the sealing grommet in place.
 We connected our shop-vac to the 2-1/2″ port provided on the back of the cabinet to draw off the extra dust created during sandblasting. We initially tried sandblasting without the vacuum, but after a few minutes, the visibility within the cabinet was reduced greatly. Also, when the cabinet was opened after sandblasting a lot of sand dust escaped the cabinet. For the typical use of the cabinet, a basic shop-vac from your local hardware store is more than adequate for the task. Just remember to clean the shop-vac regularly.
 All that is left to do is to remove the protective sheet on the window. The total setup time took less than an hour including the various additions that we added to the airlines.
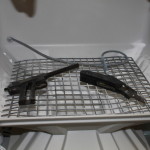 The cabinet is just right for sandblasting parts. Sandblasting long barrels requires being a bit creative by removing the grid and placing the barrel into the media well.
 At that point, I decided to start on a new campaign of cleaning and restoring them in what little spare time I have.
 Once all of the parts were disassembled they were first washed in a degreaser then flushed with warm water and dried thoroughly.
 Before I go into the details of this restoration we should take a look at the workshop so that you’ll see that it takes a good work area and good tools to work on firearms properly.